Showing posts with label LA Colors Art Deco. Show all posts

Saturday, June 26, 2010

HOOT!

First of all, can I just say: I got myself the newest NP release from MAC, In The Buff, and it is so weird! It is one of the weirdest colors I have. It is one of those "ugly pretty" shades I can't get enough of.

When I read the very first description of MAC's summer collection, I was very excited to see this because in the description it said "avocado" and so I expected a green. This is not green! It is a sand colored nude with lots of olive tone. It may match some peoples' skin to be a true nude, but it is definitely not my skin tone so I can appreciate it as a color. It looks like a brown paper bag sometimes, and sometimes more nude, and sometimes very murky olive. Strange but cool.

Anyhoot, back to the point of my post! I have recently become a huge fan of anything to do with owls. Without telling too long a story, a friend and I got these necklaces with owl pendants and call them "friendship owls" and it has made me really like anything with owls. So I figured that meant it was going to have to be on my nails somehow. I think I pulled it off>>>

If you like the owl and would like to try my hand-painted art, you are in luck! I decided to take pics as I went along so that you could have a tutorial!

Here is what I used. LA Colors Art Deco stripers in white and black, L'Oreal - Sizzling Tangerine, Barielle - A Bouquet for Ava, Seche Vite and a dotting tool. The colors you choose are not important, but you should choose well pigmented shades so that you don't have to go over the same spot several times. You will also need at least one striper polish.

1) Using one of the regular polishes you choose, make a ovalish shape in the middle of your nail, a bit below center so you leave space for the head. This will be the owl's body. Let it dry.

2) Using another color make two circles at the top of the blob you made in Step 1 and then pull them up to make an upside-down heart. I just used the nail polish brush to make these circles, but you could also use a dotting tool and a larger drop of polish if you prefer. Let it dry.

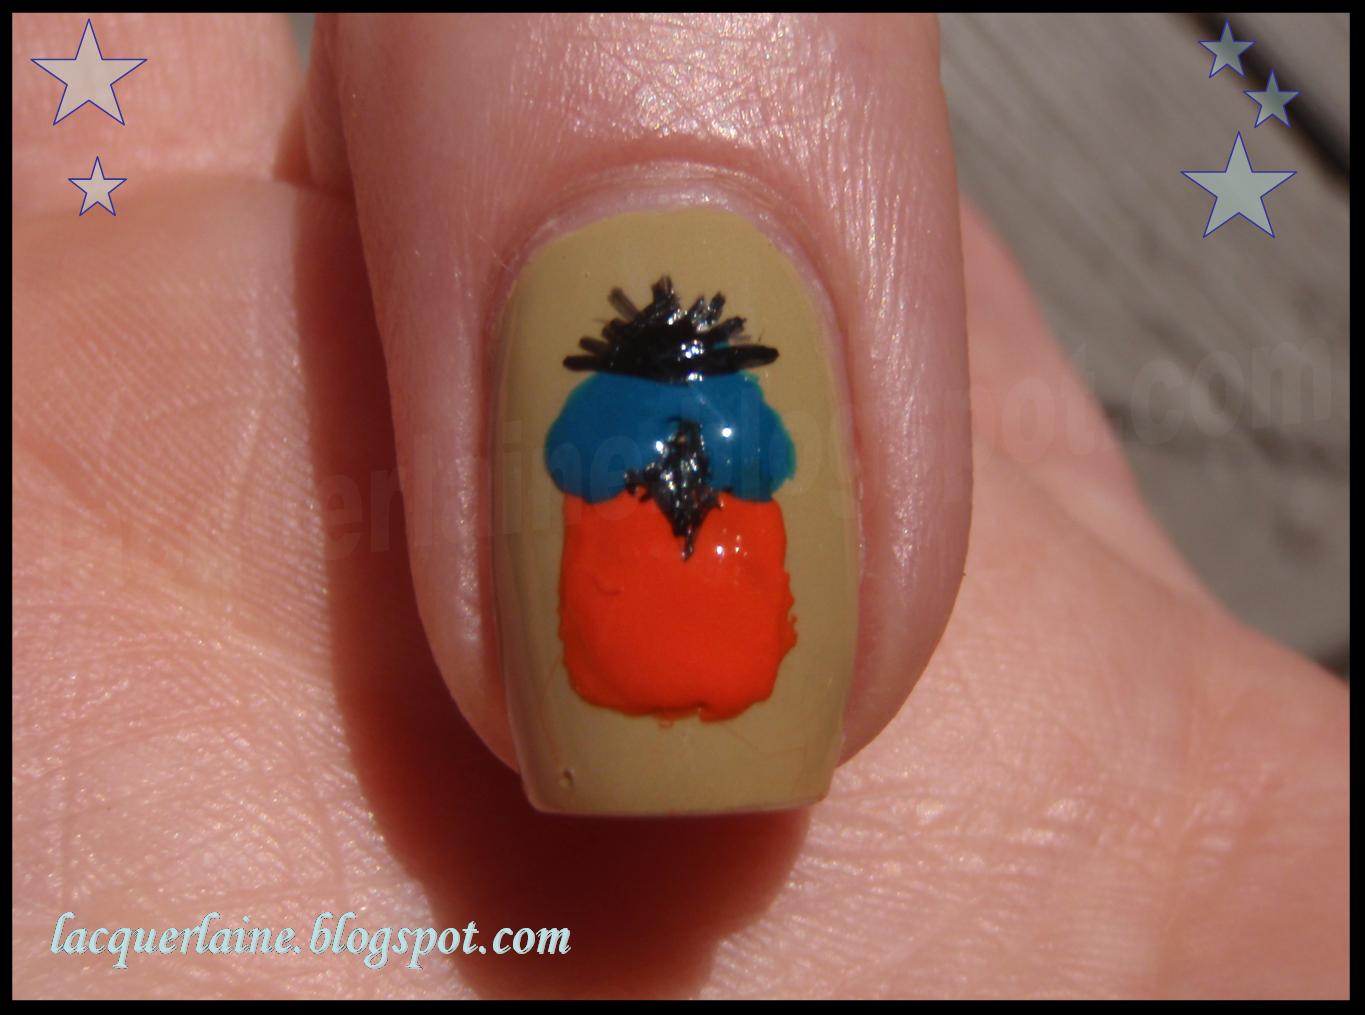
3) Using your nail art striper, make the owl's puffy feather "hairdo" on top of his head pulling the striper brush from outer to an inner point just below the tip of the "heart" we made in Step 2. Make several passes until you feel that it's puffy enough! Next, take the brush and just under the "heart" inbetween the two circles, make a little diamond shape to create his beak.

4) Using white polish and a dotting tool, make two dots for the whites of the owl's eyes. Let that dry.

5) Using black polish and the dotting tool, make a smaller dot in the center of both white dots.

6) Getting out the striper again, make two slightly curved lines on either side of the body to make wings. I made a couple passes on each side so they were a bit thicker than just a line. Then make two bunches of three little lines on the bottom of the body for his talons.

7) To finish him off, add some dots to the body with the dotting tool and whatever shades you'd like.

8) Finish off with a coat of Seche Vite, or whatever thick self-leveling top-coat you choose so that your finished owl is level and not lumpy/blobby looking.

What do you think?!
:c)

Monday, June 7, 2010

GO BLACKHAWKS!

So the Chicago Blackhawks are now up 3-2 in the Stanley Cup Finals! WOO HOO!

Base: OPI - Alpine Snow
Stripes: LA Colors Art Deco in Red Glitter and Black

Sorry I didn't include the pointer. He had a huge chip by the time I got around to taking a pic of this.

Logo:
  • China Glaze - Happy Go Lucky
  • LA Colors Art Deco - Red Glitter
  • BB Couture - Poison Ivy
  • LA Colors Art Deco - Black
  • Sally Hansen Nail Art Pen - Black (for the outline)

Have a great day!
-Elaine
:c)

Tuesday, May 4, 2010

Pretty Mint Mani

Hello! Here's a little something cute I did. This is Essie - Mint Candy Apple and I decided to "cute-ify" it. I added the bursts with Konad plate M5 and white polish, then added the bright blue rhinestone over one of them and then a little silver glitter with LA Colors Art Deco - Silver Glitter. I wanted to do it to all the nails, but decided to do it to just the ring finger first and see how it looked before doing anymore because I was afraid if I did it to all of them then it would be too much. I think this looks just right!

What do you think?
:c)
-Elaine

Thursday, February 11, 2010

Valentine's Day Mani Inspiration

I am assuming whether you are a V-Day lover or a V-Day hater, you are going to do some sort of theme manicure, right? Even if it is an anti-V-Day mani. Well if you are torn on what to dress your nails in for the big day I put together some ideas I had for Valentine's Day manicures to help inspire!

1) This is a base of Essie - Marshmallow, a jelly white, and a smorgasbord of heart stamps done with China Glaze - Romantiques: Awaken, Adore, Admire, Harmony, Cherish, Passion and Devotion. I used Konad plates M3, M35 and M73.

2) This is a base of Essie - Flirty Fuchsia, stamped with Konad plate M4 and Konad Special Polish in red and white. I topped it all off with a holographic glitter topcoat: Cover Girl - City Lights.

3) I wanted to do a manicure that didn't have the usual red, pink or white base. I chose Naughty Nailz - Left Him Cuffed To The Bed for the base (appropriate for Valentine's!). Then I stamped the little swoops with Konad plate M4 and China Glaze - Devotion. Next, I stamped the "Love" and hearts with Konad plate M2 and China Glaze - Admire and Revlon - Punch Chrome.

4) I went a bit more geometric with this one... for a second. Then I messed it all up! In a good way, of course. I started with a base of Orly - Polo Princess. Next, I painted three vertical stripes with LA Colors Art Deco striper polishes in Red Glitter and White. While still wet, I took a needle and pulled across the stripes from left to right to give a mild marbled effect.

5) Now this is not a "mild" marble. This is wild! I water marbled a red, black and white creme. (you can see my tutorial on water marbling here) Then I topped it with two coats of Cover Girl - Disco Dazzle. You could also add a heart - infused polish like below. I wish I had.

6) This is a base of a reddish pink creme: Perfect Chic - 314 and then topped with Nicole by OPI - Love Your Life. I showed you another mani I did with Love Your Life back in November:

This is Sinful Colors - Sugar Sugar with Love Your Life.

7) This one looks sort of like an anti-V-Day mani but it isn't really. I chose Sinful Colors - Happy Ending for the base since the name sounds lovey-dovey. The yellow rhinestones are heart-shaped, and then I added magenta and black to the ring finger.

8) And this one is obviously a V-Day mani. The base is another one of the new Sinful's I showed you, Easy Going and then I stamped the rose with Konad plate M36 and China Glaze - Cherish and Revlon - Punch Chrome.

What do you think? What is your favorite? What are you doing for your Valentine's Day manicure?

Stay tuned for tomorrow's post which will include my favorite Valentine's Day mani! Hmm... what could it be, what could it be? :cD
-Elaine

Wednesday, February 3, 2010

Grammy-Gaga Inspired Nails

Hello all! How are all my lovely readers?! :c)

Photo Credit: Us Magazine.com

Today's mani is one I thought up after seeing Lady Gaga's red carpet dress for the Grammy's last Sunday. I wanted to emulate the un-parallel lines and the soft purple hues (as well as the crazy pointed accessory).

What the mani consists of:
China Glaze - Light As Air (like the dress. Doesn't look like if a gust of wind got caught under there she would just blow away?)
Milani - Cloud 9
China Glaze - Devotion
LA Colors Art Deco - Silver Glitter
China Glaze - Harmony
Not Pictured: Rhinestones, Seche Vite and striper brush

I started with a base of Milani - Cloud 9.
Next, I took the striper brush and used it with China Glaze - Light As Air to make several horizontal lines on each nail covering the entire nail, but making them un-parallel to each other, so some are straight and some are not and some intersect.
Then, I took China Glaze - Harmony and did the same thing over the first stripes.
After that, I did the same with China Glaze - Devotion.
Lastly, I did the same striping with LA Colors Art Deco - Silver Glitter.

I decided to throw in the starbust accessory on the thumbs. I took a drop of Devotion and added a bit of Harmony to it on a paper plate. I mixed them with a toothpick and using the striper brush I painted the starburst on my thumbs with the mixture. I added a lavender rhinestone to the center.
Finally I topped all the nails with a coat of Seche Vite top coat and viola! Nails to go "gaga" for!!


Aren't you glad I didn't use this for inspiration?! :cD >>>

Photo Credit: The Washington Post

Have a great day!
-Elaine

Monday, February 1, 2010

Blue Blue Blue

Happy Monday all! Hope yours is good! I can't say mine isn't but it wasn't the greatest start to the day. It's all good though. I'm staying positive!

I finally saw Avatar over the weekend and all that blue got me thinking of a Avatar-inspired, blue manicure. So I did one!

I used BB Couture - Kyona Beach as a base, stamped with China Glaze - Adore from the Romantiques Collection (my favorite Konad polish) and Konad plate M57.

I took it a step further with a little blue glitter accenting some of the stripes with LA Colors Art Deco - Blue Glitter. I don't know if I like it as much with the glitter, but it's still nice.


Did you like Avatar? Have you seen it? Did you see it in 3D? I did! It was awesome! I haven't been to a 3D movie in years. Like, maybe 10 years? I plan to go to more now though.

Tuesday, January 12, 2010

Ride The Khrome Wave

I had a vision for my new China Glaze-Millennium from the Khrome collection. I wanted to use it for metallic tips on a funky french. I was then planning to swirl out the color into a little wave design. I just had to pick something for the base. I was sure I didn't want one solid color. But then what would I use? Two shades? Three? Water marble? Regular marble? Konad? Shimmer? Creme? I didn't know.

I ended up doing a regular marble design. I chose two thick, very opaque cremes to get the job done: Rescue Beauty Lounge - Underwear and Zoya - Pinta. I did a thick stripe of each on half of the nail and while still wet, I took a tooth pick and pulled the colors back and forth between them over the line that separated them. It reminded me of when I used to work in a cake bakery and I swirled yellow and chocolate cake to make marble. That was one of my favorite things to do. It never got old! It was always pretty and amusing. I find joy in simple things I guess!

Anywho, after that I free-handed the tips with China Glaze - Millennium. Then I took a thin paintbrush and carefully made the little wave following the shape of the "smile line", but circling it around. Although I was very pleased, I didn't think the wave had enough emphasis so I outlined it and the tips with a black nail art striper: LA Colors Art Deco in black. And viola! This is my creation!

Sunday, January 10, 2010

Naught-y-cal Funky French

Good evening! It's late but I was in a posting mood! I just have a quick funky french to show you. I like it, but I think it was better in my head than on the nail. I actually think the best thing about this is the title for this post! :c)

For this mani I started with a base of Naughty Nails - The Big "O". Then I free-handed the tips with Rescue Beauty Lounge - Dead Calm. That worked well since it is a very opaque, one-coater polish, so doing tips with it was nice and easy. No streaking, and I didn't have to go back and do a second coat. Then I used LA Colors Art Deco striper in red glitter to go over the "smile line" of my french to sort of hide any wavering in my line.

Have a good night and I will have something new for you in the morning!


-Elaine

Sunday, December 20, 2009

Dashing Through the Snow... With my pretty painted toes...

The holidays are upon us! I decided to get festive with my tooties!! It's really thanks to the BF. I was going to redo my toes and picked out a nice orange creme: Sally Hansen - Sonic Bloom. I showed him what I was going to use and he did not seem enthused. He said "Why don't you do them for Christmas? With snowmen!" Okay, dear. You got your wish!


LEFT FOOT

Big Toe
China Glaze Emerald Sparkle
Migi Nail Art Pen in white
LA Colors Art Deco in Red Glitter

Little Toes
Unnamed shimmery white from Borghese Allegra set
Unnamed red glitter from Borghese Allegra set

RIGHT FOOT

Big Toe
China Glaze - Caribbean Blue
LA Colors Art Deco in Black
Migi Nail Art Pen in White
LA Colors Art Deco in Red Glitter
Tropez - Black Satin
Konad Special Polish in white
Konad plate M3

Little toes
China Glaze - Emerald Sparkle
Konad Special Polish in white
Konad plate M3